| < Managing links | Style sheet editing > |
The image library
HelpSetMaker allows the inclusion of images into the texts. Two types of images are supported: Stand-alone images and inline images. Both types are rendered from PNG, JPG, or GIF files.
The image files can be put everywhere on the disk. HelpSetMaker works with the concept of so-called “image catalogs”, of which an arbitrary amount can be attached to a HelpSetMaker project. Their combination forms the “image library” for the project. Note that new projects always have a “pics” subdirectory which is created as a default image catalog. In most cases, this will be totally sufficient.

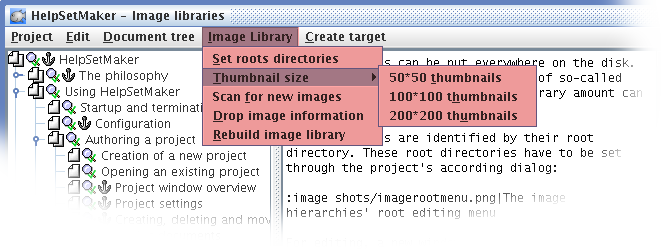
Image library management menu
There are the following operations to manage the image library:
-
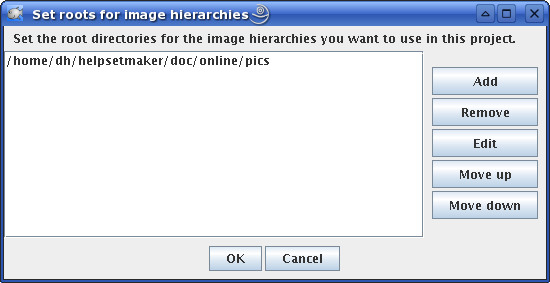
Set root directories: The dialog which is opened by this menu item allows to setup the root directories for the image catalogs. It shows all attached image catalog root directories as a list. You edit this list with the buttons on its right. Note that order is important, images with the same name below their respective root directory are always found in the hierarchy which comes first in the list.

The image library root dialog
After pressing “OK”, the changes are taken and all image libraries are rescanned.
-
Thumbnail size: One of three predefined sizes for the thumbnails in the image library's representation in the bottom of the project frame can be set. This submenu is also available as a popup menu directly in the thumbnail area. Thumbnail size changes immediately. Note that creating the thumbnails may take some time but happens in background so that you can continue working on the project.
-
Scan for new images: If images are added to one of the catalogs, this function must be called once so that HelpSetMaker becomes aware of the new images. The operation is usually inexpensive and does also remove internal information on images which have been removed in their catalog.
Note that no special action has to be taken if an already known image is changed. HelpSetMaker recognizes such changes automatically the next time the image is accessed (by looking at it in the library, using it in the editor or exporting the project) and takes all needed actions.
-
Drop image information: If for some reason the image library behaves strange, this menu item can be used to mark all internally stored information about the image as invalid. The information, especially the image dimensions, are rescanned the next time the image is accessed. As this operation is usually unneeded, a special warning message has to be confirmed before it is executed.

Warning message before dropping the image information
-
Rebuild image library: If dropping the image information does not solve problems with the image library, this menu item can force a complete rebuild of the internal information. The rebuilding actions after this will take even more time.
Note that the last two options have been added especially as the image library code is quite new (as speaking for Oct. 2006) and could include some unpleasant surprises. The “old” image library rebuilding code of versions 1.0.1 and earlier took always the “Rebuild image library” actions.
Image inclusion
HelpSetMaker scans each image library for all available pictures. These scans are done recursively through all subdirectories (without any directory named “.xvpics”). From the STML document, an image is always addressed by its path relative to the according image root directory.
HelpSetMaker shows all images it finds below the image root directories for the project as icons at bottom of the project window. An image can be included by simply dragging it from there into the editor of the current document. HelpSetMaker automatically creates the STML code for either an inline image which is put into the text or a stand-alone image which is printed between two paragraphs and has a caption.

Image inclusion by drag'n'drop
Images in the preview window beside the editor are normally scaled down automatically to not more than 200 pixels width or height. This makes the image much better visible in the narrow window and does not waste too much space. This behaviour can be turned off in the project's settings.
You can change the thumbnails' size either from the menu or by right-clicking into the thumbnail area. The resized thumbnails are shown as soon as their computation has finished.
Manual image inclusion
If you, for whatever reason, cannot use the drag'n'drop mechanism for image inclusion, you can also insert the images directly into the STML source code. As HelpSetMaker addresses images relative to their root, you have to give the path appropriately: Assume the image file's absolute path to be /tmp/piclib/icons/ok.png and the respective library's root directory /tmp/piclib. Then, the images identifier within the STML source is icons/ok.png.
See also the image description in the STML manual.
Image link checking
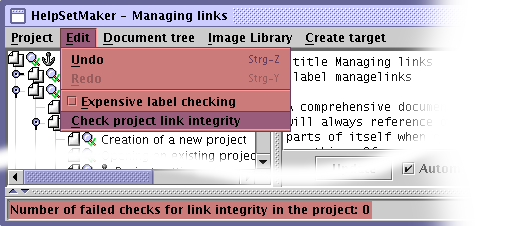
If you have added or (re)moved images and rebuilt the image libraries, you should also run an explicit integrity check of the document to become aware of any image link problems.

Explicit integrity check
| < Managing links | Style sheet editing > |